
Are your prices making your customers balk at checkout?
Offering payment for higher-ticket services in multiple small chunks rather than one huge payment upfront can make a big difference in conversions. But make sure you know what you’re getting into!
Key Takeaways:
Squarespace Payment Plans split a service price into scheduled charges or collect a deposit upfront, and both options are built natively into Service products priced at $100 or more. This offers an alternative to Subscription Products or Pricing Plans, which can be set up to work similarly to installment payment plans, but there are some core differences. If you are selling Physical products, there is yet another option to break up payments into multiple charges: you could use one of the buy-now-pay-later providers like Clearpay and Klarna that are integrated with Squarespace. These providers pay the seller the full amount upfront and absorb the collection risk themselves, at the cost of a higher processing fee. Choosing the right method for you depends on what's the best fit for your customers, so check the comparison table below for help. You'll also need clear terms in the product description and website policies, including what happens when a payment fails, or risk future headaches and legal issues.
If you sell coaching packages, courses, high-ticket events or commissioned work, the price tag is often the thing that makes people hesitate at checkout. Squarespace payment plans let you soften that blow by collecting a deposit upfront and/or splitting the total across scheduled charges, so a £1,200 programme stops feeling like a single scary number. There are actually a number of different ways to achieve this, with different pros and cons. Let's get into how it all works.
Squarespace Deposits, Payment Plans, Subscription Products, Pricing Plans, Buy Now Pay Later - which one do I need?
Although this article focuses on deposits and installment payments, you can actually achieve the same net effect using a few other methods, too. These approaches share certain similarities, but they behave very differently for your cash flow and your admin, and some of them have restrictions on when you can use them. Here's the quick run through of all available options before we set anything up.

Example of a service page with payment plan enabled
Deposits & Installment Payments (aka Payment Plans)
There are 2 types of Payment Plans that you can set up for Service Products:
A deposit takes a partial payment now and leaves the rest due later. Good for booking a slot or securing a commission, where you want commitment but the full job hasn't happened yet. An installment plan splits the total into a series of scheduled charges on the same card. The customer agrees once, and Squarespace attempts each payment automatically on the dates you set.
You can combine a deposit and an installment plan - for example, the total is £1000 and you take a £500 deposit now, then £250 in a month, then £250 a month after that. If you set up a payment plan and/or deposit, the checkout page will show two options to your customer: pay in full or pay deposit, as shown in the screenshot.
Here’s what you need to know about Payment Plans:
The total price must be £100 / $100 or more
They are available for Service Products only; you cannot take installment payments for Physical Products (goods) or Digital Downloads. There are ways around this, though. You can book a Quick Help Session if you need help with this.
A deposit + balance is actually an installment plan made up of 2 payments; you set them up the same way.
You can set installment payments to be taken on regular intervals (weekly, biweekly, monthly, or custom duration), or you can set them to be taken on custom calendar dates.
You can optionally choose to set a date by which the plan is no longer available to purchase. This is particularly useful for events, where you might want to offer flexible payment for early birds, but lock down full payment as the only option closer to the event date.
Even if you set up a Payment Plan, the customer is also shown the option to pay in full upfront, alongside the Payment Plan option.
Subscription Products
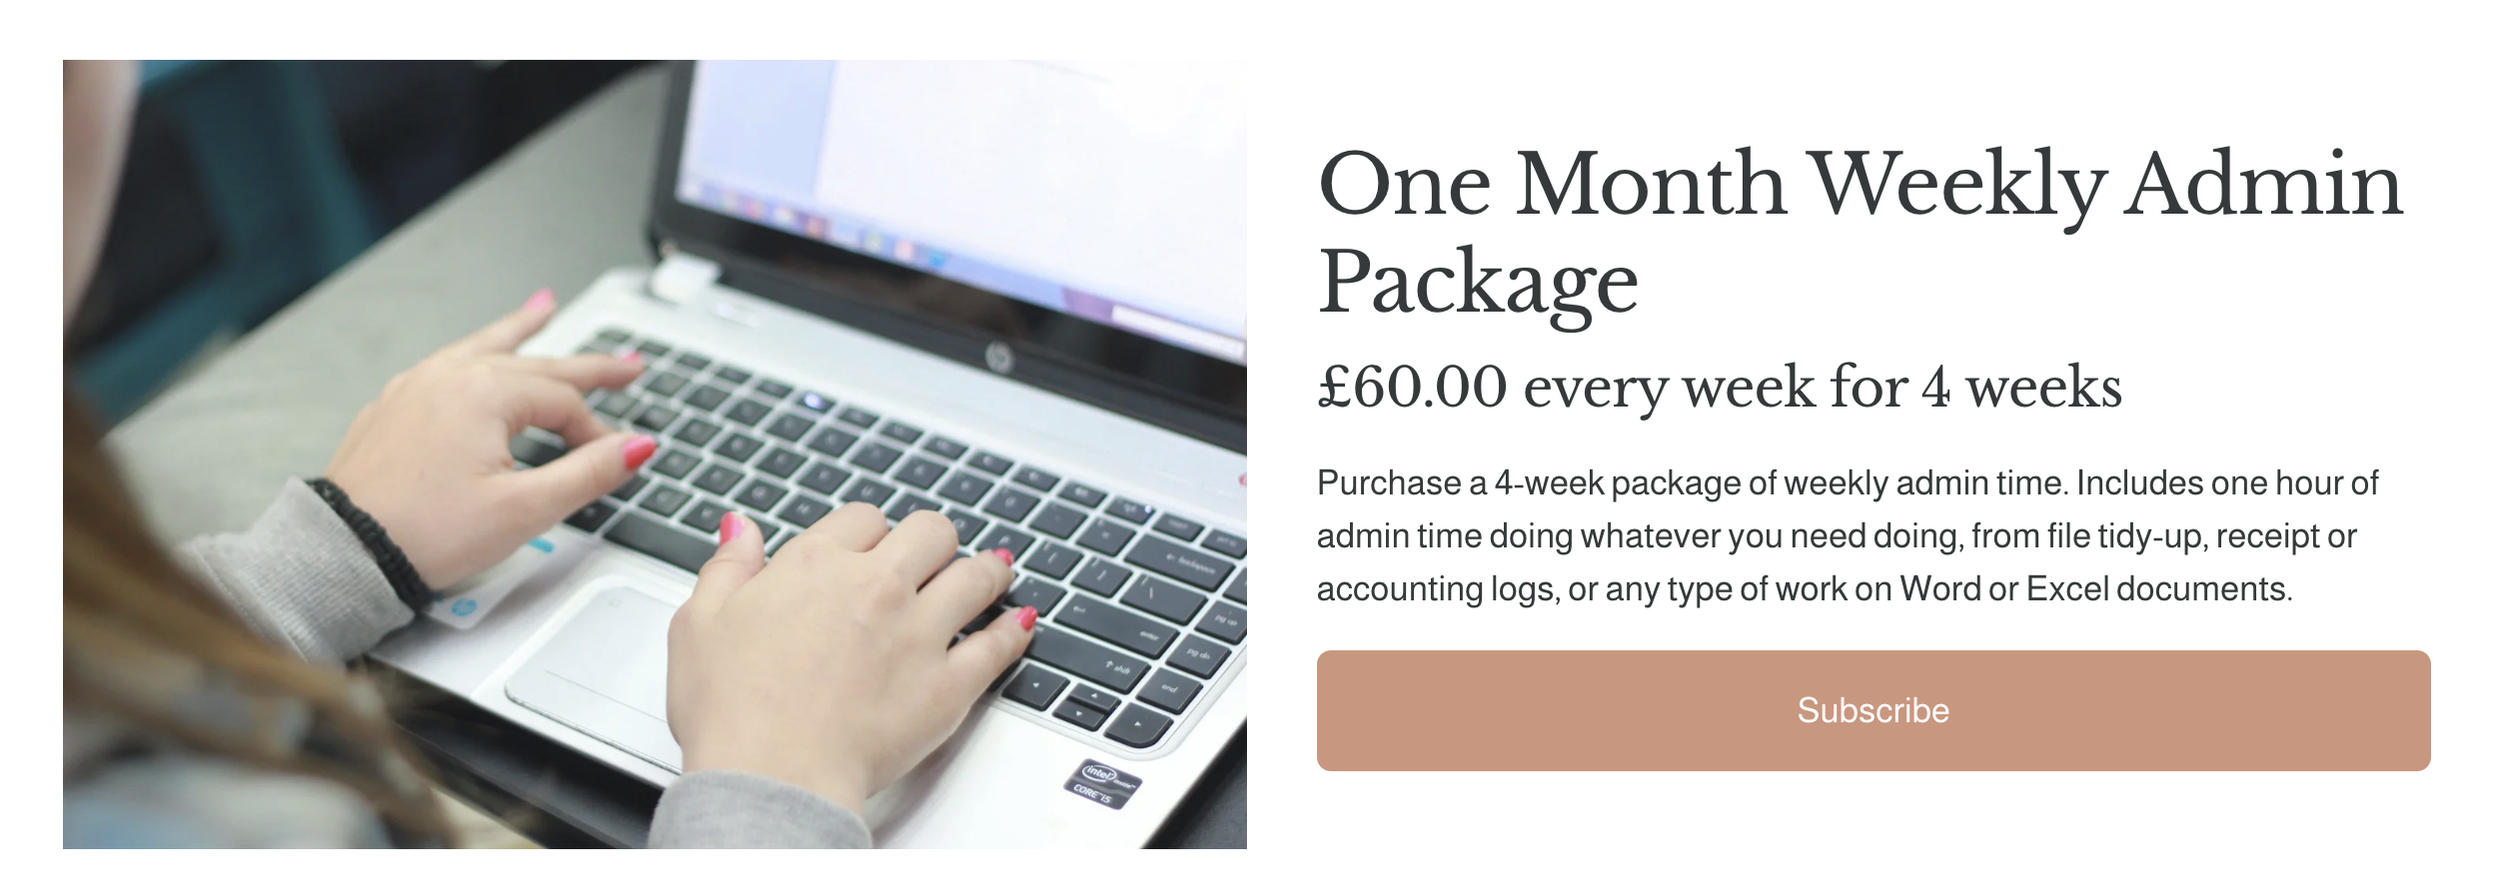
Example of a Subscription product page
Although most often used for things like weekly food or coffee delivery boxes, a Subscription Product can be set up to behave very similarly to an installment plan - for example, the total you want is £1000 so you could set a Subscription Product to take £250 once a month for 4 months. Here’s the rules about Subscriptions:
Subscriptions can be set for any amount; there is no lower threshold like there is with installment plans.
Subscriptions can be for Service Products or Physical Products.
You can set a Subscription to be rolling, meaning it just keeps charging X amount every Y days/weeks/months until cancelled. Or you can set it for a fixed number of payments, just like an installment plan.
You can’t combine a deposit with a Subscription. Every payment on a subscription must be the same amount.
You can’t show a pay in full option on a subscription product, like you can with Payment Plans. Subscriptions will only show the amount of the payment taken each week/month/whatever (as shown in the screenshot above). They don’t show the total amount of the package paid over time.
Subscription Products get special wording at checkout and email reminders that sound different from the wording on installments or deposits. For example, the Subscribe button shown on the screenshot.
Subscription Products may be subject to certain legal restrictions in your country. For example, you might need specialised Terms & Conditions or be required to send advance notice of subscription payments.
Pricing Plans
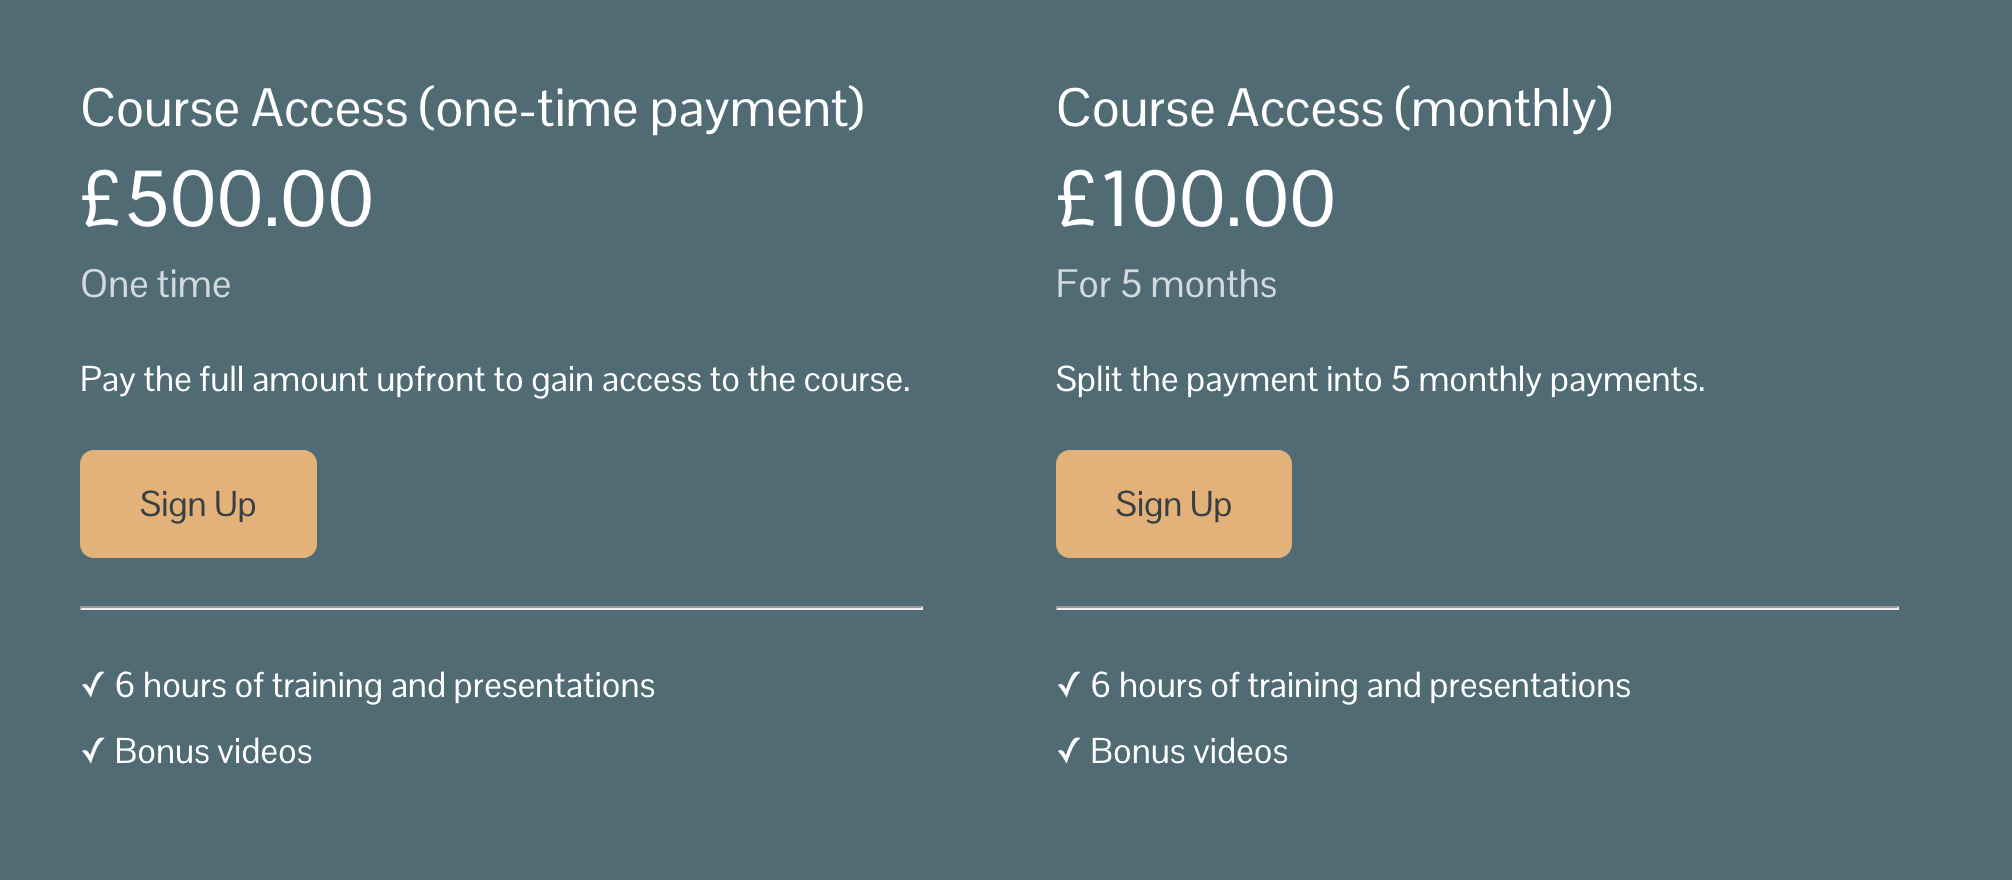
Example of two Squarespace Pricing Plans
Perhaps the most confusing of all is the Pricing Plan, which sounds a bit too similar to Payment Plans to me! Pricing Plan is the name that Squarespace uses for paywalled content, such as membership sites or courses - but they can be used for much more. A Pricing Plan is tied to accessing a secret part of your website: a page or pages, a blog, course, video gallery or any other page type. This means you could use Pricing Plans if you are selling tickets to an in-person event and you want to give attendees access to an online hub where they can download the slides or replay presentations. And since you can have multiple pages within a gated area, all accessed by user login, Pricing Plans offer a good alternative to setting up basic password-protected pages for things like managing photography commissions, when you might want to share multiple pages: terms & conditions or contract documents before the work, and private photo galleries upon completion.
A Pricing Plan has the following characteristics:
Pricing Plans can be set for any amount; there is no lower threshold like there is with installment plans. You can even offer free Pricing Plans, which makes them incredibly flexible. Use free ones to offer comped tickets to an event, allow shared access to private galleries or more.
You can set a Pricing Plan to be rolling, like a subscription. Or you can set it for a fixed number of payments, just like an installment plan.
You can’t combine a deposit with a Pricing Plan. Every payment on a Pricing Plan must be the same amount.
If you want to offer full payment upfront as an option, you’d need to set up two separate Pricing Plans (see screenshot above).
Pricing Plans get special wording at checkout and email reminders that sound different from the wording on installments or deposits. For example, the Sign Up button shown in the screenshot.
You can add a Pricing Plan selling “widget” (shown in the screenshot above) to any Squarespace web page, they don’t exist as part of a Shop page. They do not get shown among your other products/services that you have in your Shop page. This may or may not be desirable.
Pricing Plans are subject to additional processing fees of up to 7% if you’re on the cheapest Squarespace plan.
Pricing Plans are always tied to allowing access to gated/private content on your website.
There is a limit to the number of pricing plans you can have on your website (but in practice it’s unlikely you’ll hit that 500 limit).
Buy Now Pay Later from Afterpay/Clearpay or Klarna
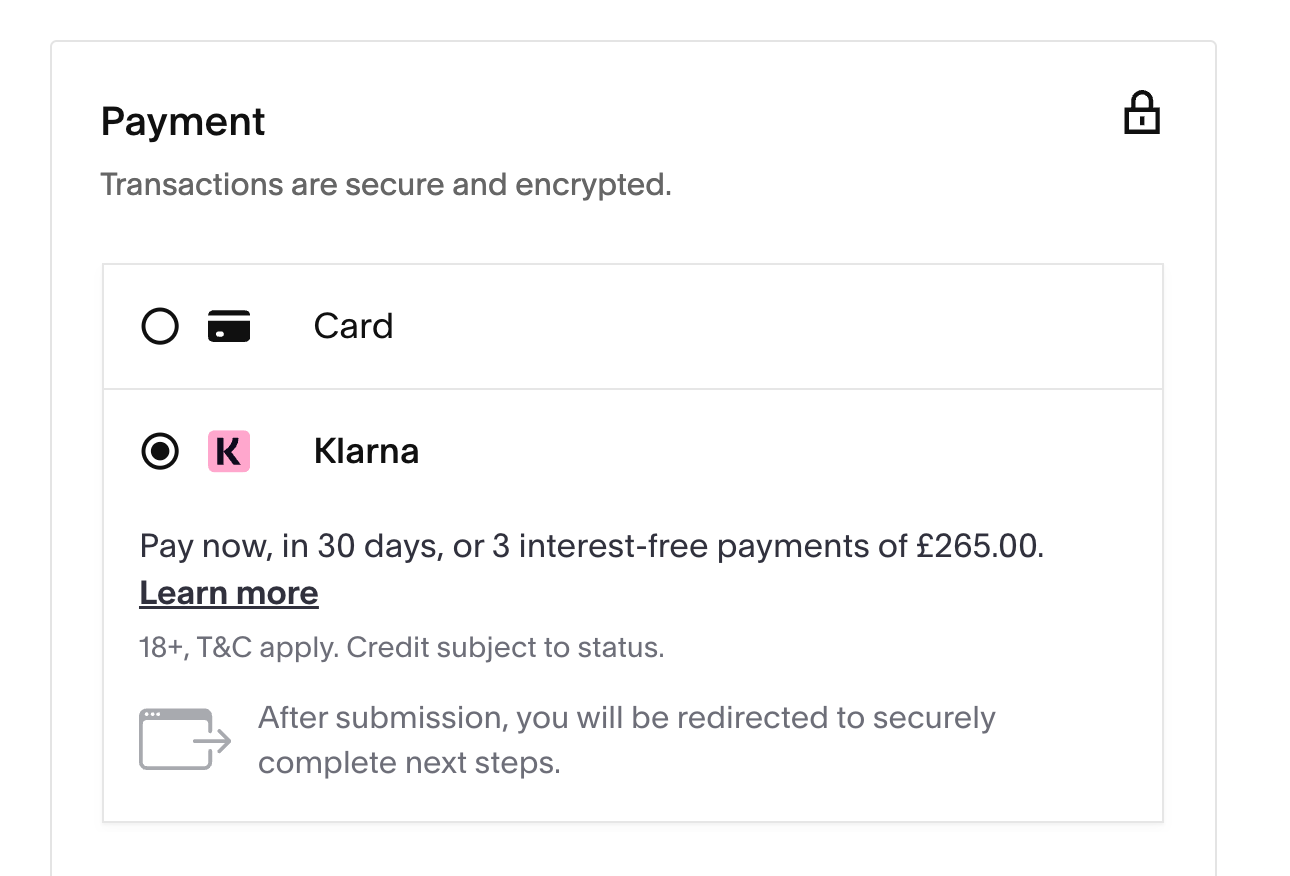
Klarna showing on the checkout screen nested under Payment > Pay Another Way
A buy now pay later (BNPL) provider like Clearpay (called Afterpay in some countries) or Klarna sits between you and the customer: the customer pays a portion of the total, but the provider pays you the full amount upfront, then chases the customer for the rest themselves. This means you don’t carry the risk of non-payment on later transactions. However, BNPL is only available for Physical products, not Service products*, and there are some big user experience drawbacks to BNPL that stop me from recommending it in most cases (see bullets below). A BNPL option has the following traits:
BNPL is not available in all countries; Squarespace only supports certain BNPL providers in a selection of countries, and your customers will also need to be based in those countries. Not ideal for international sales.
BNPL pays you the full amount upfront, so your financial risk is reduced.
The BNPL provider charges you a fee; this can be around 6% or more (on top of the usual card processing fee) so be sure to check the rates for your BNPL provider in your country. This can add up, especially for high-ticket items!
BNPL has no lower threshold; you can use it for any products with any price.
If you turn it on, it’s a sitewide setting so it shows as an option for everything you sell. You cannot cherry-pick to offer BNPL only on certain products/services. This may not be desirable.
BNPL is only available for Physical Products, unless you know the workaround*.
BNPL providers often often multiple ways to split the payment, and the buyer can choose which one they want.
BNPL is a third party and not integrated as smoothly with the sales funnel as the above options. The customer won’t see BNPL at all on the product page; there’s no mention of it whatsoever, so it’s not immediately obvious it’s even an option unless you explicitly mention it in your product description. The BNPL option should appear during checkout, but if the buyer has their browser set to default to Apple/Google Pay, Link or certain other payment systems, they might not see it at all. You have to manually select it, and this is often hidden under “Pay another way”. This is the single biggest reason not to use BNPL in my opinion.
*If you want to use a BNPL option for a Service rather than a Physical product, there are ways around this using custom Fulfillment Profiles. You can book a Quick Help Session if you need help with this or are wondering which of the above options is the best for your circumstance.
Comparison of all split payment options
| Method | Ideal for | Biggest benefit | Biggest drawback |
|---|---|---|---|
| Deposit | Bookings, retainers, commissions | Simple way to secure a portion of the payment upfront | You absorb the risk of non-payment of the balance |
| Installment plan | Workshops, events, high-ticket services | Clean and simple user experience | You absorb the risk of non-payment of the balance |
| Subscription product | Time-based delivery or batched services, high-ticket products, courses | Can be rolling or fixed term | Language around subscriptions and lack of total price shown may not be desirable |
| Pricing plan | Anything where you want to give access to a hidden part of your website, such as courses or events | Can easily be added to any page on your website, no need for a shop page | Subject to additional processing fees from Squarespace |
| Buy now pay later (Clearpay, Klarna) | Physical products, lower-ticket products | The provider absorbs the risk of non-payment of future installments | Not very visible as an option during checkout so can get missed entirely |
Other Squarespace payment methods
Although one of the above methods is usually best when you want to split high-ticket items into multiple payments, I do want to mention a couple of alternatives that might be a better fit depending on your specific needs. The two options below are often overlooked simply because many people don’t know about them. In both cases, these options have the benefit of not needing to setup a product or shop page, and they have other benefits, too.
Squarespace Invoices
Not many people realise that you can send invoices through Squarespace. This is particularly useful for situations where you want to offer a highly customised service, such as taking artisan commissions or creating tailored packages. Invoices might also be a good solution in business-to-business circumstances where the person paying has specific accounting needs, such as having a PO or project number on the invoice. For payment in installments, you would need to manually split the payment and issue multiple invoices, but the process of creating invoices is simple. Although you can’t (yet) take deposits via Squarespace Invoices, it’s easy enough to create and send 2 invoices. You can also create and send proposals, contracts and estimates through the same system.
Squarespace Pay Links
Pay Links are unique links that you can send to your customer in an email or get them to scan a QR code to request payment for anything, for any amount. Like Invoices, you don’t need to create or setup a product in a shop page. Clicking on the Pay Link or scanning the QR code takes your customer straight to the checkout process, reducing user experience friction. This means Pay Links have been designed for situations where you don’t need to market your product/service with a sales pitch on a product page… BUT you might not realise that you can attach a Pay Link to a Squarespace button on any web page, meaning you can actually use Pay Links for a huge range of purposes, without the hassle of driving users through the full “add to cart” process and checkout that you’d get using a shop page on your website. And the QR code is super handy if you need to take payment in person: simply show the code on your phone, then your customer scans and pays. Really useful for taking last minute bookings at events or taking in-person payments for pretty much anything.
So why am I mentioning Pay Links in an article about taking installment payments? Well, there are some instances where you might want to hand-hold your customers through a series of payments by sending them a drip series of emails. For example, you want to take payment at 3 key points in the run-up to an event, but also email them info about the event at the same time. You could set up 3 different Pay Links and put those links into your 3 drip emails. You can’t really do this kind of thing with a deposit/installment setup. Those emails are generic and set by the Squarespace system.
There is a downside to Pay Links: unlike products in a shop page, there is no ability to track inventory or easily see the number of times a Pay Link has been used. And in the above scenario, it’s not immediately easy to see at a glance whether all 3 payments have been made. Worth bearing in mind!
OK, now that we’ve explored all of the options available, let’s talk about how to setup the most common scenario: Squarespace Payment Plans for deposits and/or installments.
Setting up to take deposits or installment payments
The most important point to note before you start is that deposit and installment features are available if you are using Squarespace Payments or Stripe as your payment processor. If you're running checkout through a connected PayPal account, you won't see these options unless you switch to Squarespace Payments or Stripe.
To summarise, the requirements are:
Squarespace Payments or Stripe is enabled. There’s no PayPal option.
You're using a Service product. Squarespace payment plans are only applicable to Service Products, not Physical Products or Digital Downloads. If you've been selling your package as a Physical or Digital product, you'll need to rebuild it as a Service Product; you can’t switch product types.
The price is $100/£100 or more. This is the threshold Squarespace sets for flexible payment options on Service Products. Anything under that won't show the deposit or installment options.
Customer Accounts are activated. This feature is what allows users to login and see past/future payments and manage their card details. For more information on the settings associated with Customer Accounts, including how this shows in your site navigation, check out the Squarespace Customer Accounts support page.
If your site isn't set up for commerce yet, or you're not sure which option is actually best for you, this is exactly the kind of thing we can work on in a focused Squarespace support session rather than an afternoon of trial and error on your own.
How to take a deposit on Squarespace
A deposit is the simplest place to start, and it's the right fit for anyone who needs to lock in a booking before doing the work. Photographers taking a retainer to hold a wedding date, an artist securing a commission, an event vendor needing some upfront commitment before they reserve the room.
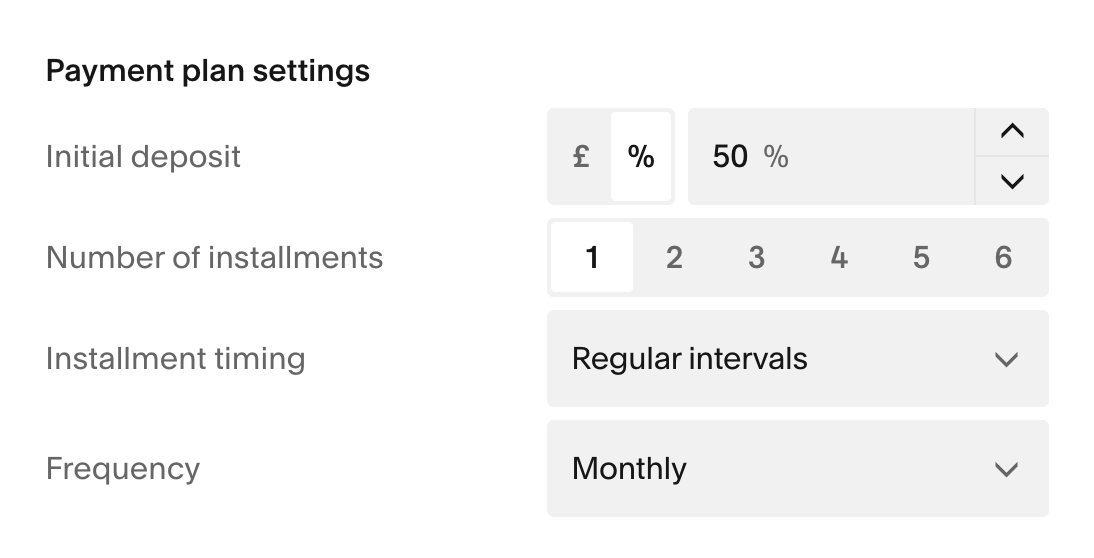
Example showing a 50% deposit/balance setup
Open the Pages panel and go to the store page that holds/will hold your Service Product.
Click the Service product you want to edit (or create a new one and set the price to $100/£100 or above).
Open the Payment options area within the product editor.
Enter your initial deposit as either a fixed amount or a percentage of the total. A 25% deposit on a £800 package collects £200 now.
Set the number of installments. This means the number of additional payments subsequent to the deposit. Choosing 1 means the full balance will be taken as the final/only payment after the deposit.
Save and preview the product so you can see exactly what the buyer sees.
From a logistics perspective, the deposit is really the first charge of a payment plan, with the balance treated as a later installment. That means you can structure it as "deposit now, balance on a set date" without managing the second payment by hand. Squarespace attempts to take the balance on schedule, the same way it would any other installment.
How to set up installment payments for service products
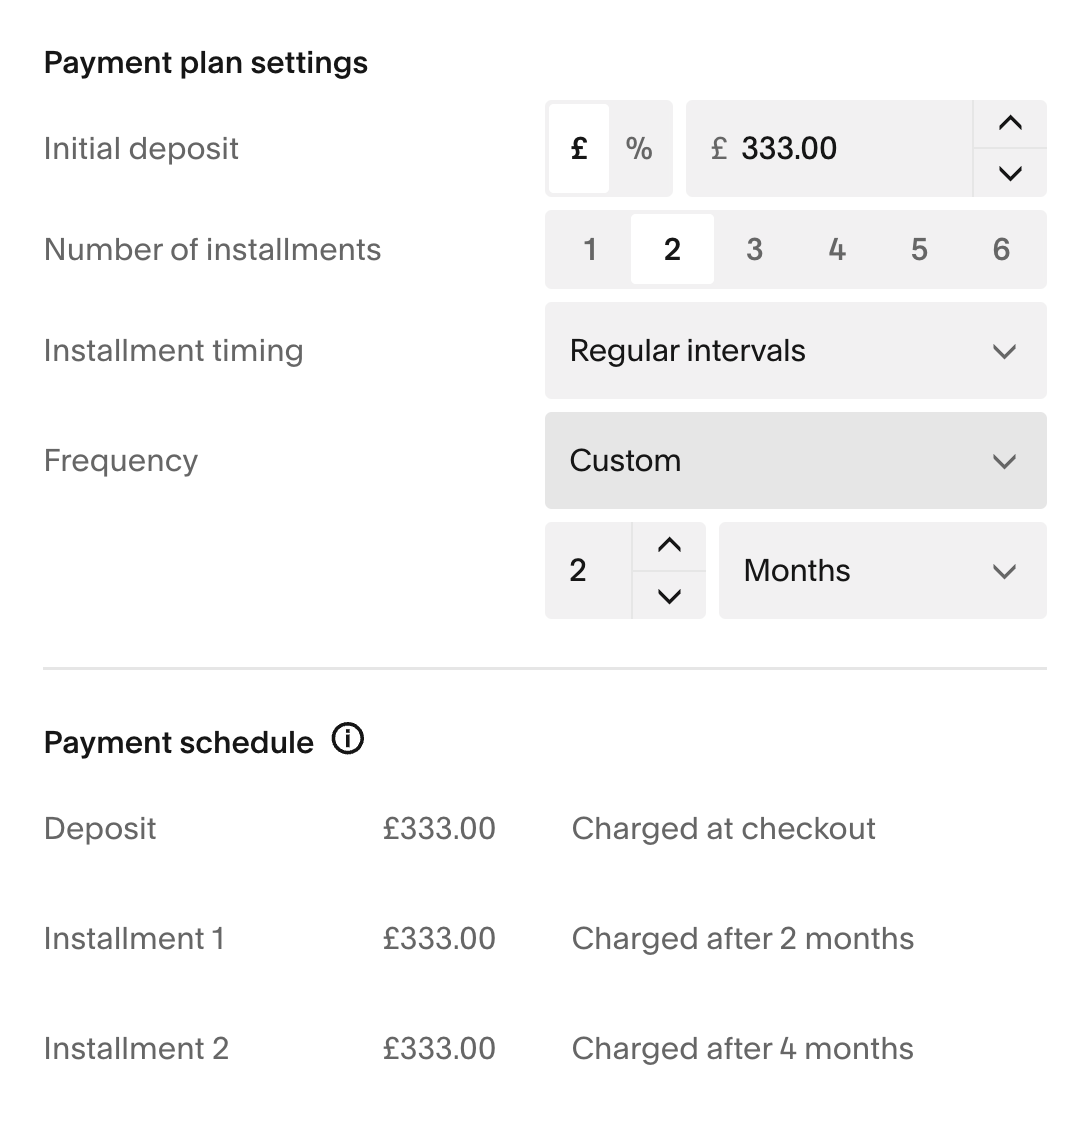
Example showing 1/3 total charged 3 times
An installment plan splits the full price into a sequence of scheduled charges on the customer's card. This is the route for course creators, coaches selling multi-month programmes, and anyone whose offer feels expensive as a lump sum but reasonable in three or four bites.
From the Pages panel, open the Service product (priced at $100 or more).
Open the Payment options area within the product editor.
Set the initial deposit amount, which acts as the first installment. This may seem counter-intuitive if you are planning to charge in equal installments, but it’s the way it has been set by Squarespace. It’s what allows you to set a different payment amount to frontload the initial installment if you want to.
Set the number of installments. This means the number of additional payments subsequent to the deposit. For example, if you set your initial deposit to take 25% of the total, and then choose 3 installments, this means the customer will be charged a total of four times for 25% each time. I know, it would be clearer to show 4 installments, but these are the constraints we have to work in. It’s not too hard to see what’s happening, because there’s a Payment Schedule shown below the panel where you enter the settings so you can see exactly what’s going to be charged and when (see screenshot).
Save, then run a test view of the checkout to confirm the breakdown reads clearly.
The exact setup steps can shift as Squarespace updates the platform, so the Squarespace Payments documentation is the source of truth for the exact current screens to follow.
What the customer sees at checkout
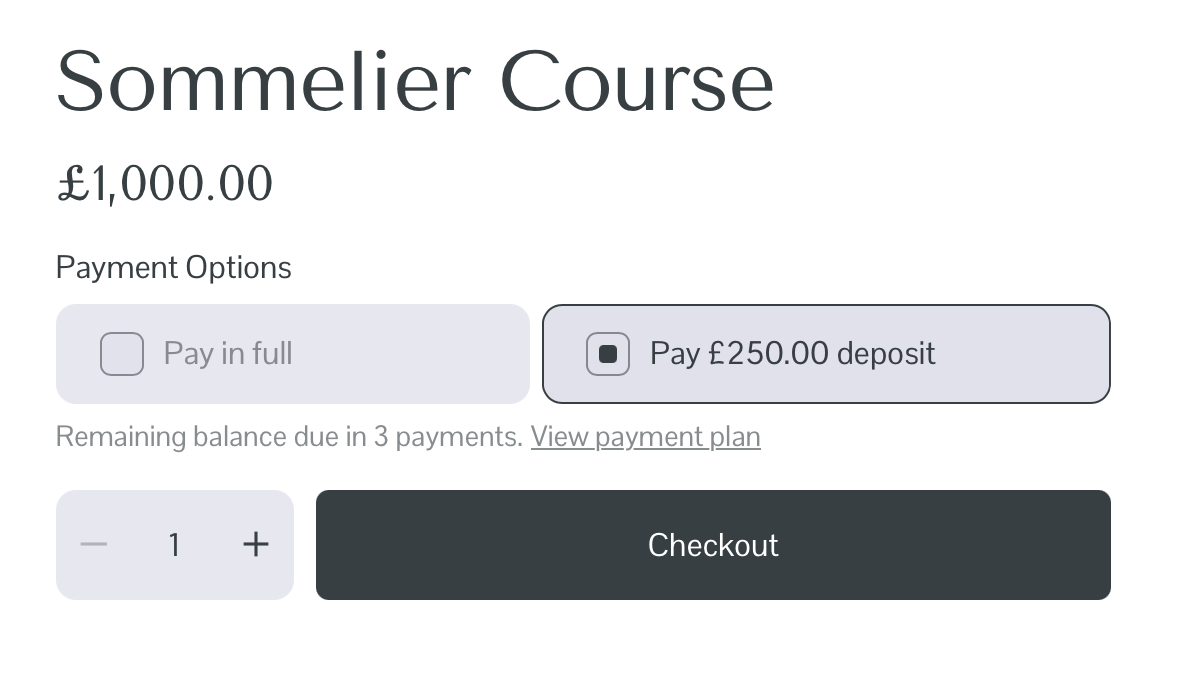
Checkout showing a 4-installment payment plan
When a payment plan is active, the product page shows the total amount with an option to Pay in full or Pay deposit. As soon as a user clicks to select Pay deposit, a new line of text appears below the options that shows the installment breakdown, so the buyer understands they're agreeing to a series of charges, not a one-off.
At checkout they enter card details once and authorise the full schedule. They are also prompted to create a customer account if they don’t have one already, so they can login to see their charges.
Their order confirmation and receipts reflect the plan, and Squarespace charges the saved card automatically on each scheduled date. From their side it's smooth.
From your side, remember that every future payment depends on that card still working, so you should regularly check the status of Payment Plan purchases in your Orders panel. See all possible statuses and what they mean on the Squarespace help page.
Don’t forget to check/edit the customer emails as part of setup
There’s a raft of different emails that your customers will receive associated with Payment Plans, so be sure you double-check and edit those so you know they say what you want and look like you want them to before you start selling!
From the main admin panel, go to Products & Services > Selling Tools > Customer Notifications
Under where it says BY PRODUCT TYPE, choose Products & Services
On the following screen, you will see a section called PAYMENT PLANS and under this, you will find all of the emails associated with installment payments: payment successful, reminder, refunded, failed or canceled.
Remember: you're carrying the debt
Although I’ve mentioned it above, it often gets glossed over in most setup guides so it’s worth reiterating. When you run an installment plan through Squarespace, the money doesn't land in your account upfront. You receive each payment as it clears, which means you've delivered some or all of the service before you've been paid in full. If a later charge fails, you're chasing it.
Squarespace will attempt a failed payment again, and you can see the status in your Orders panel. But a card can expire, hit its limit, or get cancelled, and there's no guarantee the remaining balance ever arrives. You’ll need to keep an eye on your Orders panel to be aware of problems.
There are also some ways to help manage that risk:
Weight the first payment heavily so most of the value is collected before you deliver anything.
Reserve installments for situations where you can withhold delivery until paid, or
For a booked package or course access, decide in advance whether a failed installment payment freezes access, and put that in your terms so it isn't a fight later.
Which leads nicely on to…
Spell out the terms so there are no surprises
If you are offering any type of split payment approach, you need to have watertight Terms & Conditions. Add a short, plain-English block to the product page covering how many payments there are, when each one lands, and what happens if one fails. Expand on that wording in your store policies. Clear terms cut down on "I didn't realise you'd charge me again" emails, which are the main admin tax of running these types of plans.
FAQ
-
There is no real difference; both deposits and installment plans are set up using the Payment Plan function on the Product editor. In fact, the first “installment” is called “deposit”. The only difference is that a deposit can be for any amount or percentage of the total, but all subsequent installments must be equal in value.
If you want to set up a 2-payment scenario where you take a deposit upfront and a balance later, you set this up as deposit + 1 installment.
If you want to set up payment over 4 equal installments, you set this up as a 25% deposit + 3 installments.
-
No, not for Service products. Squarespace now offers native deposits and installments built into Service Product settings, as long as Squarespace Payments or Stripe is active and the price is $100/£100 or above. You'd only need a third party like Clearpay, Klarna or a subscription tool if you want the provider to carry the collection risk or you're selling physical products that don't qualify for the native feature.
You could also use Squarespace Subscription Products or Pricing Plans, depending on what’s best for your specific needs.
-
With a Squarespace Payment plan, Squarespace retries the failed charge and flags the status in your orders, but there's no guarantee the balance ever arrives if the card is cancelled or maxed out. You carry that risk. Decide in advance whether a failed payment pauses access to the service, and put it in your terms. With a buy-now-pay-later (BNPL) provider, a missed payment is the provider's problem because they've already paid you in full.
If using Payment Plans, it’s highly recommended to check your Orders panel regularly to look out for any Payment Plan orders that show Past Due, Defaulted, Canceled or Needs Attention as the status. Full details can be found on the Squarespace help page.
-
Yes. When a Payment Plan is enabled on a Service Product, customers will see the option to spread the cost or pay the total in one go. If using a buy-now-pay-later provider, they add their own "pay later" choice alongside standard card payment (but as mentioned above, this can be a bit hidden!). Giving people the full-payment route as well matters, because some buyers will happily pay upfront and you don't want to nudge everyone toward installments you then have to chase.
-
You can set up Payment Plans on any Squarespace subscription level.
-
No, there are no fees charged to the customer. They pay the same amount regardless if they choose to pay in full upfront or pay in installments.
There’s no way for you to charge a different price for Payment Plan products. However, if you really want to incentivise your customers to pay upfront in full, there is a workaround. You can achieve this if you use Pricing Plans rather than a Payment Plan.
-
Not if you use Squarespace’s built-in Payment Plans. Products with a Payment Plan are subject to the same Squarespace processing fees as any other product; the exact fees vary depending on your Squarespace subscription plan. When working with high-ticket products, these fees can quickly add up. Be sure to work out how many sales you expect and what those processing fees might add up to; it may be worth switching to a higher Squarespace plan if the total is greater than the difference you’d pay in monthly subscription fees.
If you decide to go for a third-party buy-now-pay-later (BNPL) option such as Klarna or Clearpay, then you will be charged up to 7% by the BNPL provider. You’ll need to weight up whether the loss of this revenue outweighs the benefit of getting paid in full upfront, and not having to chase customers for payment on later installments.
Need help choosing?
If you’re not 100% sure that Payment Plans are the right way to go for your exact scenario, I’d be happy to talk you through the options specifically as they relate to your customers, product type, and cashflow needs. You can book a Quick Help session directly into my diary so you can be confident you made the right choice and get tips on how to make your setup smoother.