How to save page versions in Squarespace

Create page backups so you can safely work behind the scenes
Learn the right way to use page versions in Squarespace to avoid broken links and lost SEO
Does Squarespace have versioning? Technically “no”, Squarespace doesn’t have a versioning system - but it’s easy to create versions and backups of pages, products, events or blog posts. On Squarespace 7.1, you can even create backups of page sections.
There are a number of cases when making backups or saving different versions of pages is a good idea:
You want to make changes to a page, but you want to ensure you can roll back to the previous version in case you make mistakes.
You want to play around with layouts or explore different approaches to a page, without touching the live public-facing page.
You want to temporarily promote something on a page, and then turn it off later.
You want to create a snapshot in time, so you can refer back to old versions of your content in the future if you need to.
WARNING: Using versions the wrong way can break your website!
Be sure to follow my tips below to ensure you don't end up accidentally creating broken links when you swap out your versions. Otherwise, any links in your email newsletters and social media, or any bookmarks your customers might have saved will not work - nor will the links on Google. In extreme cases where you have lots of broken links, Google may penalise you for having a poorly maintained website.
Jump to instructions on how to create backups/versions for:
Page sections (Squarespace 7.1 only)
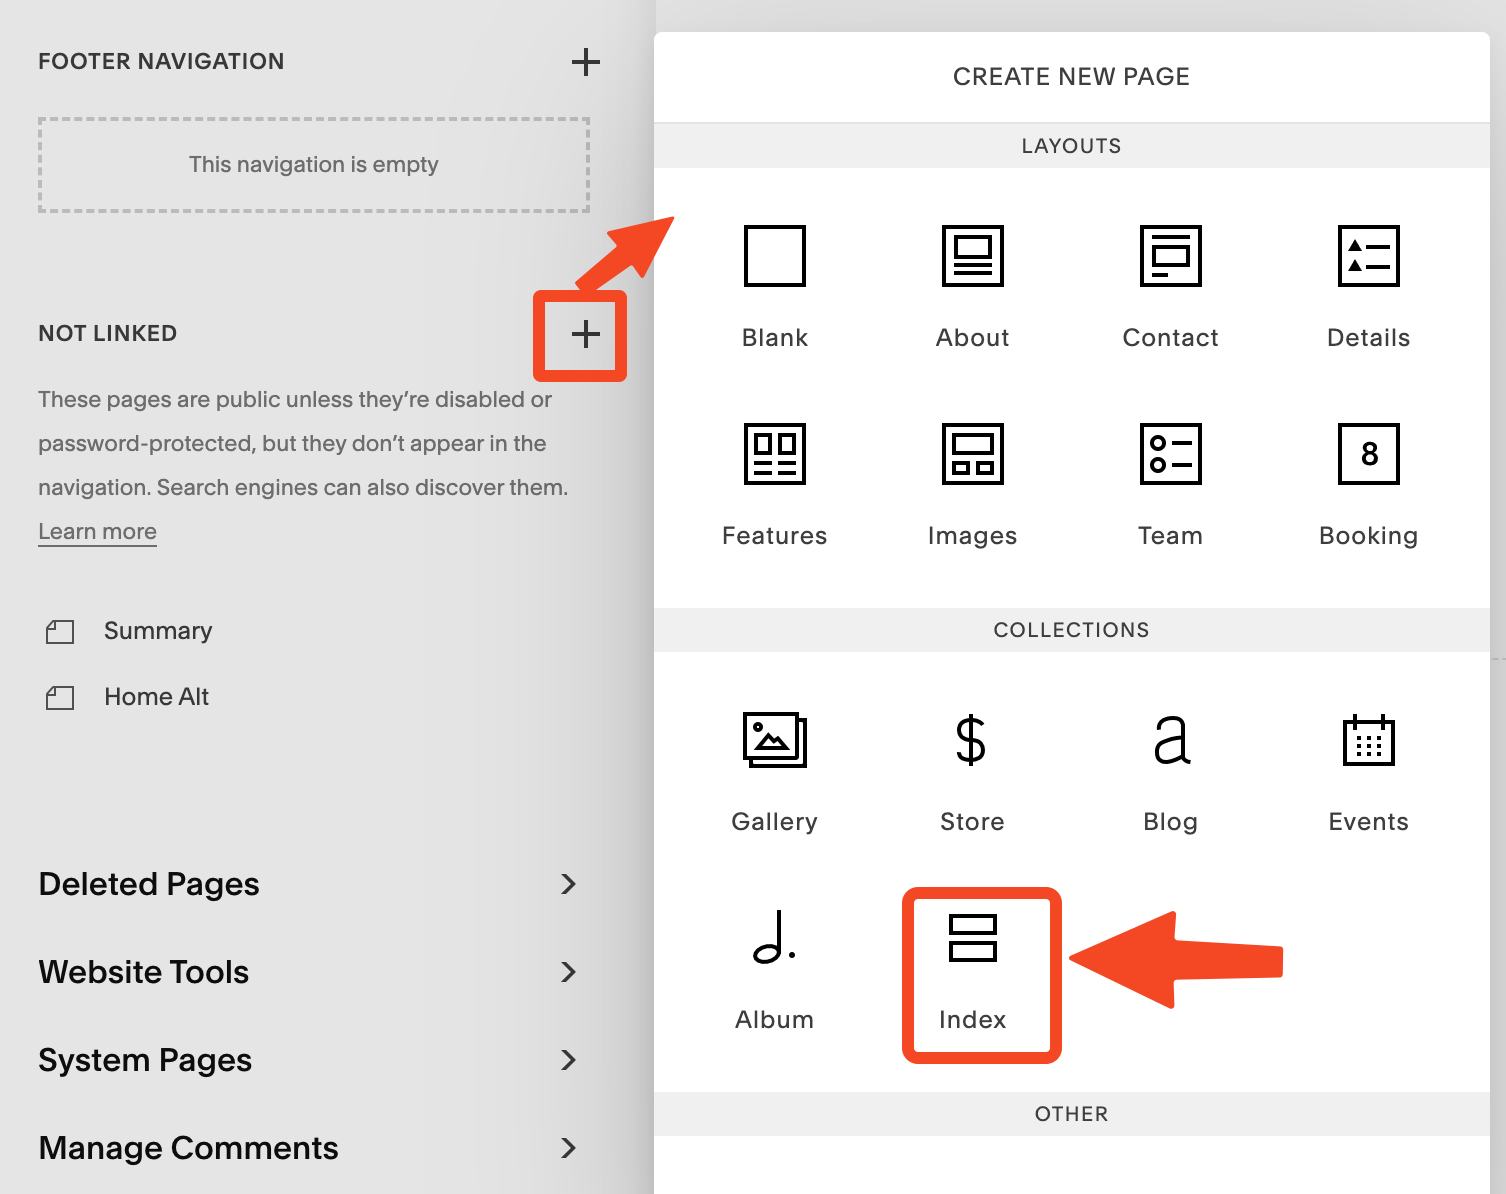
Index pages (Squarespace 7.0 only)
How to do page versions or backups for a normal Squarespace web page
Part 1: Create the page backup
A normal page shows the piece of paper icon (Squarespace 7.1 or 7.0). Tip: If you are using Squarespace 7.0 and your icon looks like two boxes stacked, check the Index pages instructions here.
Page Settings
In the Pages menu, hover over the page name and click on the SUN / COG icon to open the Settings (TIP: It’s easy to remember where to find the settings if you think “the sun is setting”)
Scroll down on the General settings til you see Duplicate Page. Click to make a copy (confirm if it asks you if you’re sure).
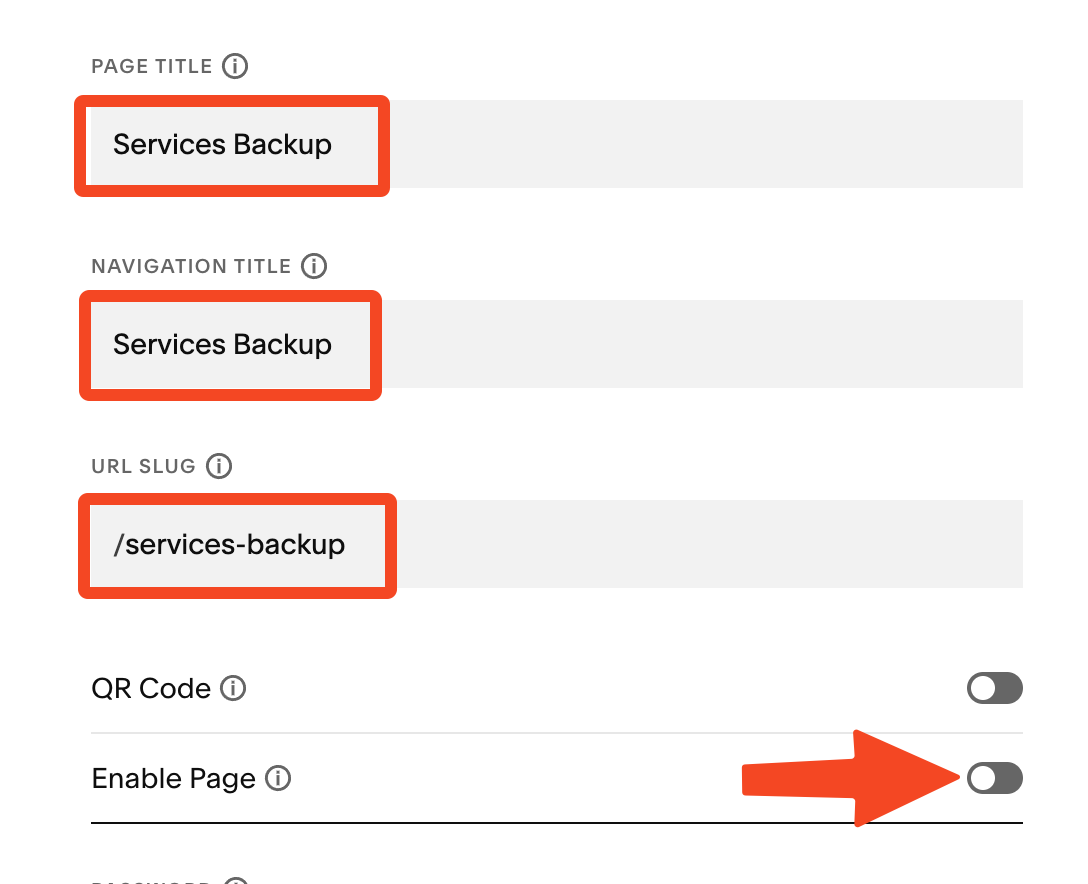
The copy will automatically appear in the top of the Not Linked area of the Pages menu, ready for you to give it a name. You can start typing the new name right away, while the text box is still highlighted. If you accidentally click away, you can always open the Page Settings to change the name. Give it a sensible name such as “Services BACKUP” (see * for other name options).
My tip is to actually put the new name in 3 places in the Settings: the Page Title, Navigation Title and the URL slug (you can type the first one and then copy/paste into the others). This will help you avoid confusion later on.
WARNING! The new copy is technically live and available - this means it can be found by Google! To hide the newly copied backup from Google and anyone else, you need to toggle OFF Enable Page to completely disable the page and make it only visible to people who are logged in as editors. This is the most secure way to keep your backup.
You have now successfully made the backup. You can now decide whether to edit the live version of the page, or you can edit the backup copy instead, and then launch that version when you are happy with the edits (see Part 2 below). This means you have more time to play around with things over multiple editing sessions, so it’s normally the approach I recommend if you plan to make large edits.
* If you’re doing this approach, then you might want to name your copied page “Services NEW” or something like that, just to be 100% crystal clear about which version is the new one.
TIP: You can also put a date into the Navigation Title if you will be making multiple backups or versions and don't want to get confused later about which is which. This will enable you to see at a glance which one is the latest.
Part 2: Restoring a Squarespace page to a previous version or launching a saved backup/copy
You need to do Part 2 if you have been editing the copy instead of the live page and you are ready to go live with your changed version, or if you messed up on your edits to the live page and need to restore the backup. You do not need to do Part 2 if you edited the live page successfully and therefore don’t need to restore anything.
These are the critical steps needed to ensure you do not end up with broken links on your website. You should follow these steps in sequence ASAP - don’t do part of the steps below and then go away to do something else. Always do all of these steps in one go.
Step 2: Copy the URL slug
Find the live page that you want to replace and make a mental note of where this page sits within the Pages menu.
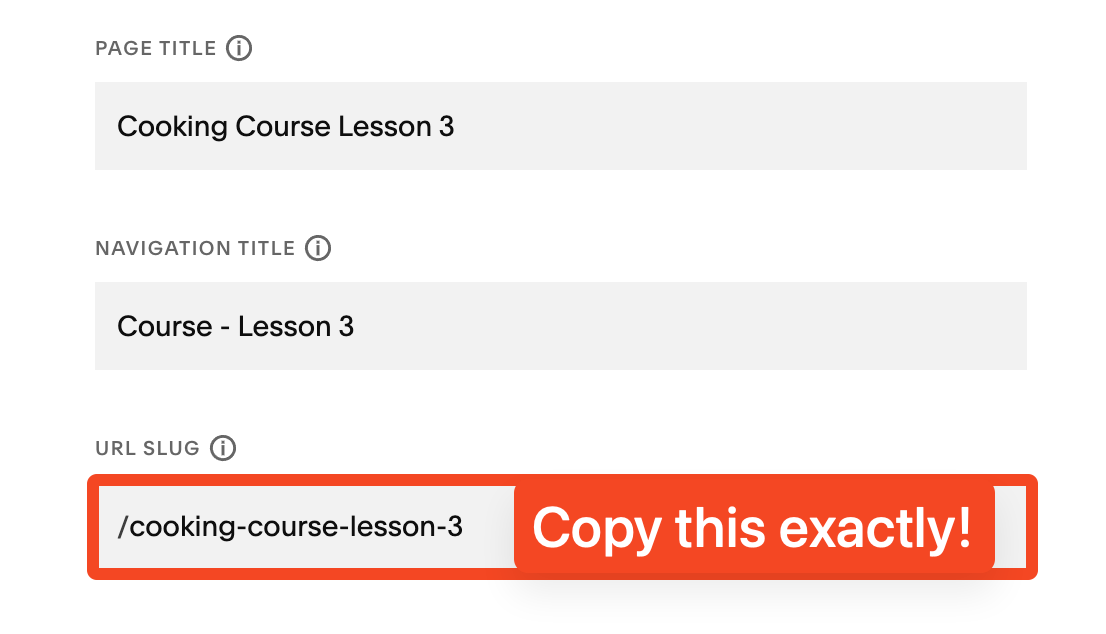
Open the Page Settings of the live page that you want to replace. Copy/paste the existing URL slug into a scratchpad or text file (this is very important, so make sure you copy it EXACTLY). Make a note of the Page Title and Navigation Title, too.
After you have made a note of the exact URL slug, you can now change the URL slug to anything else. I normally just add the word “old” to the end of it (eg. /services-old ). You may also want to add the word “OLD” to the Navigation Title as well.
Scroll down to the bottom and toggle OFF the Enable Page toggle. This disables the old page from the public/Google.
Now, find the copied page that you want to replace the old page with, and drag that copy into a position that is next to the old one in the Pages menu.
Open the Page Settings of the copy and paste the old URL slug into the URL slug box (ie. replace the URL slug with the original URL slug of the page you are getting rid of).
Update the Page Title and Navigation Title to reflect what the old page had, too.
Scroll down to the bottom and toggle ON the Enable Page toggle. This makes the page visible to the public/Google, at the same address that the old page had, so all links and buttons will continue to work seamlessly.
You can now safely either dispose of the old page, or move it down into the Not Linked section to act as a backup.
How to do versions or backups of blog posts or events in Squarespace
The exact steps vary a little depending on whether you are on Squarespace 7.0 or 7.1, but the concept is the same: duplicate the blog post, then edit the copy or the original.
Steps for duplicating a blog post or event in Squarespace 7.1, or an event in Squarespace 7.0:
Go to your Blog or Events page, and in the list of posts/events in the skinny panel on the left, find the post or event that you want to duplicate.
Hover over it and click the 3 dots icon, then choose Duplicate.
The window will close and your backup copy will appear at the top of your list of posts/events, saved in Draft form.
Steps for duplicating a blog post in Squarespace 7.0:
Go to your Blog page, and in the list of posts in the skinny panel on the left, find the post you want to duplicate.
Click the little grey Edit button on the post in the list that you want to open the Settings window for that post.
In the window that pops up, look at the bottom and click Duplicate. Confirm.
The window will close and your backup copy will appear at the top of your list of posts, saved in Draft form.
Now that you have your duplicated event or post, you can choose to edit the original, or if you will be making lots of changes and you don’t want them to show as live immediately, then you can edit the duplicate copy that you just made. Bear in mind that if you have blog comments turned on, the comments won’t be copied across to the duplicate. In this case, the best thing to do is to edit the original, so your comments will stay attached to the post.
If you decide to edit the duplicate, then you will need to follow the steps below to swap out the old version for the new version once you are ready to launch the new version of the post or event. WARNING: If you don’t follow the steps below, you will end up with broken links on your website!
Steps for replacing an old blog post or event* with a new version on Squarespace 7.1:
* These steps also apply for events on Squarespace 7.0
For blogs only: Go to the old post/event that you want to replace and make a note of the date when it was published.
For either blogs or events, hover over the 3 dots and choose Settings.
Scroll down to find the Post or Event URL. Copy/paste the URL into a notepad because you will need it later. Note: you will only be able to copy/paste the last bit of the URL, for example /blog/last-bit
Change the URL by adding the word -old to the end.
You now need to disable the post by “unpublishing” it. To do this, go to Options. Then, where it says Status, click on Published and change the status to Needs Review or Draft. Or, if you are sure you don’t need the old one, you can simply delete the post.
Now, go to the new version of the post/event that you want to swap for the old one. Go into the Settings and find the URL. Delete what’s in the URL space and paste in the old URL you copied in step 3.
Next, go to Options and change the Status from Draft to Published.
For blogs only: Use the calendar date picker to set the publish date to match the date you noted in Step 1. This ensures your blog post appears in the right order in your list of blog posts.
Steps for replacing an old blog post with a new version on Squarespace 7.1:
Go to the old post/event that you want to replace and make a note of the date when it was published.
Hover over the post and choose Edit to open the Settings.
Go to the Options tab and find the Post URL. Copy/paste the URL into a notepad because you will need it later. Note: you will only be able to copy/paste the last bit of the URL, for example /blog/last-bit
Change the URL by adding the word -old to the end.
You now need to disable the post by “unpublishing” it. To do this, go to back to the Content tab. In the bottom right corner where it says Published, click on the word Published and change the status to Needs Review or Draft. Or, if you are sure you don’t need the old one, you can simply delete the post.
Now, go to the new version of the post that you want to swap for the old one. Go into the Options and find the URL. Delete what’s in the URL space and paste in the old URL you copied in step 3.
Next, go to Content and change the Status from Draft to Published.
To change the date, click on the little underlined date that appears below the word Published and use the calendar date picker to set the publish date to match the date you noted in Step 1. This ensures your blog post appears in the right order in your list of blog posts.
How to do versions or backups of Products in Squarespace
Part 1: Create the product backup
How to duplicate a Product
In the Pages menu, find the shop page where your product lives. Open that page and in the left side of the page where all the products are listed, double-click on the product to open the product editor.
In the top right corner next to the trashcan icon, click the icon showing 2 overlapping squares. This duplicates the product and opens the copy for you.
Check the product name, and if you see the words (Copy) at the end, you have successfully duplicated. You can now click Cancel in the top left corner. This will close the editing view.
You should now be back at the list of all products, but you might not see your newly copied product showing. If that’s the case, hit the browser refresh button (circular arrow) and when the screen refreshes, you should see your copied product showing in the list as Hidden. It will show at the top of the list on Squarespace 7.1, but it will show at the bottom of the list on Squarespace 7.0.

New version (copy) and old version of product
You can now decide whether to edit the copy, or whether you want to keep the copy as the backup and edit the live product. Remember that editing the live product means you have to launch your changes immediately, so if you want a bit more time or you are nervous about making changes to a live product without being able to test and preview everything, you might want to edit the copy.
Part 2: Restoring a Squarespace product to a previous version or launching a saved backup/copy
You need to do Part 2 if you have been editing the copy instead of the live product and you are ready to go live with your changed version, or if you messed up on your edits to the live product and need to restore the backup. You do not need to do Part 2 if you edited the live product successfully and therefore don’t need to restore anything.
These are the critical steps needed to ensure you do not end up with broken links on your website. You should follow these steps in sequence ASAP - don’t do part of the steps below and then go away to do something else. Always do all of these steps in one go.

STEP 2: Go to Marketing > SEO and URL
Find the live product that you want to replace and drag the copy to sit right next to the live product. Doing this step maintains the order of your products on the product page.
Double-click on the live product that you want to replace. In the left side list of product sections, click on Marketing to jump down to the relevant location that has SEO and URL.
Click Edit and in the window that pops up, copy/paste the existing URL into a scratchpad or text file (this is very important, so make sure you copy it EXACTLY).
Now, change the URL so it has -old at the end and hit Apply. This closes the SEO/URL window.
In the main product editor screen, on the left side click Organization. Where it says Visibility at the top, change this to Hidden and then Save to close the editor.
Now double-click on the product copy that you want to swap for the original one. In the left side list of product sections, click on Marketing to jump down to the relevant location that has SEO and URL.
Click Edit and in the window that pops up, delete the URL and paste the exact URL that you copied in step 3. Hit Apply.
In the main product editor screen, on the left side click Details to take you to the Product Name. Delete the words (Copy).
Finally, on the left side click Organization. Where it says Visibility at the top, change this to Public and then Save to close the editor. That’s it!
You can now decide whether you want to trash the old one, or keep it hidden as a backup.
How to do versions or backups for page sections in Squarespace 7.1
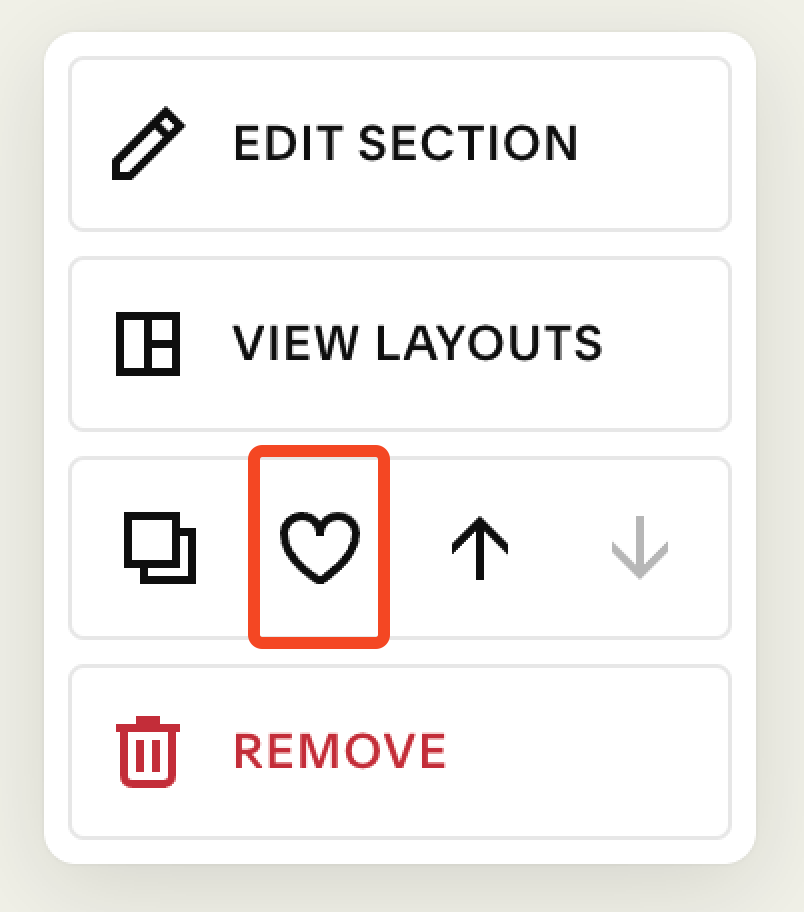
Luckily, making backups of page sections is super easy: all you need to do is hover over the section, and click the little heart icon in the Edit Section panel. This saves the section to your Saved Sections, so you can restore/reuse the section anywhere on the website. Save it to This Website (unless you want to reuse the section on another Squarespace website).
To insert a Saved Section, when you are in page edit mode, simply click Add Section and then in the section browser, on the left side under Add a Section, choose Saved Sections. Click on the little preview of your relevant Saved Section to install it on the page.
How to do versions or backups of Index pages in Squarespace 7.0

Example of an Index page within the Squarespace Pages Menu
An Index page is shown as horizontal strips with a tree structure (Squarespace 7.0 only). An Index page is a compound page made up of multiple sub-pages that appear as the piece of paper icons within the tree structure. These are effectively acting as page sections - that is, they are individual parts of the compound page.
Normally you don’t need to save a backup of an entire Index page; it’s much more common that you will want to backup a page section, since it’s more common to make edits to a page section or two, rather than the whole page. I usually recommend this approach, because it’s a pain in the neck to make backups of entire Index pages. To backup an entire Index page, you would need to make copies of each individual section, and then make a new container (Index) to hold those copies. Totally possible, but totally annoying – and very time-consuming if you have lots of sections.
Making backups of individual Index page sections is still not as straightforward as it should be. It’s a little confusing, because pages that are acting as sections within an Index behave differently than standalone pages. This means you will need to make a new container for your backup, or else when you go to look at or edit the copied page section, it won’t look like it does on the live Index page.
but here you go:
Part 1: Backup the Index page section
STEP 5: Create a new Index container
In the Pages menu, hover over the page name and click on the Sun / Cog icon to open the Settings (TIP: It’s easy to remember where to find the settings if you think “the sun is setting”).
Scroll down on the General settings til you see Duplicate Page. Click to make a copy (confirm if it asks you if you’re sure).
The copy will automatically appear in the top of the Not Linked area of the Pages menu, ready for you to give it a name. You can start typing the new name right away, while the text box is still highlighted. If you accidentally click away, you can always open the Page Settings to change the name. Give it a sensible name such as “About Intro Section BACKUP”.
My tip is to actually put the new name in 3 places in the Settings: the Page Title, Navigation Title and the URL slug (you can type the first one and then copy/paste into the others). This will help you avoid confusion later on.
We must now IMMEDIATELY create a container for this backup section. Go to the top of the Not Linked menu and click the + icon and choose Index to create a new Index container.
Find the newly made Index container and click the Sun/Cog icon to open the Settings. Give the container a sensible Navigation Title, such as “About Page Backup Sections”.
Scroll down and toggle OFF Enable Page to completely disable the Index page and make it only visible to people who are logged in as editors. Save.
Now you need to IMMEDIATELY drag the page you created in steps 1-4 into the container in order to hide the section from Google, but still have it available for you to see and edit. Some people don’t realise that if an Index container is hidden from Google, the subpages within that container are hidden even if they are technically “enabled”.
TIP: If you don’t perform steps 5-8 exactly as written, you either risk your section being found by Google, or you will not be able to see/edit the section properly.
Part 2: Restoring a Squarespace 7.0 Index page section to a previous version or launching a saved backup/copy
The steps for restoring a backup section or launching a new version from a copy are the same as Part 2 for pages near the top of this post.
Tips for managing page, product or post versions in Squarespace
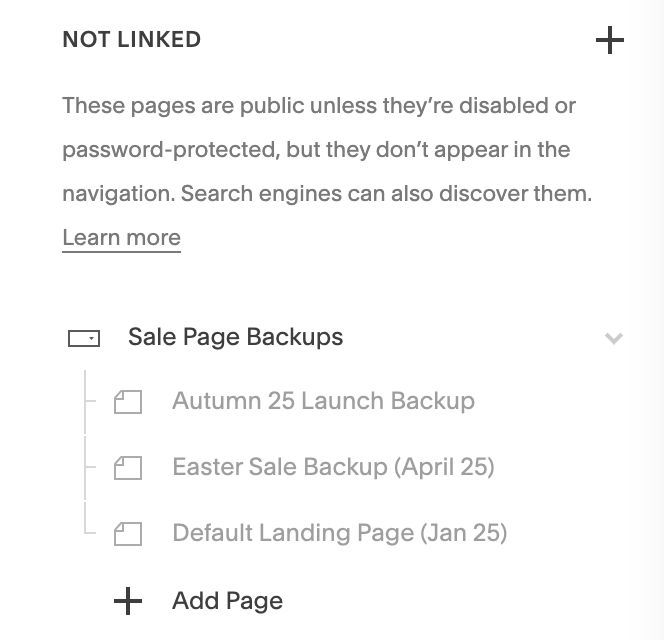
Example backups folder
That’s it! You can now safely use your copies as backups or for managing versions on Squarespace. Here are some more tips to help keep you organised:
If you have lots of backups, you can create a Dropdown in your Not Linked area and store all your backups there. A Dropdown acts like a folder.
You can put a date into the Navigation Title if you will be making multiple backups or versions and don't want to get confused later about which is which. This will enable you to see at a glance which one is the latest.
Don’t forget to periodically clear out your backups to keep your menu area clean and tidy.
If you are on Squarespace 7.0, be sure to store your Index page section backups within an Index collection, not the same Dropdown as your other page backups.
For blog post and event backups/versions, you might want to use the Needs Review status rather than the Draft status. This will help separate your backups so you can easily see at a glance what is a backup and what is an actual draft post.
For product backups, you might want to create a hidden/disabled Shop page in your Not Linked section, called Product Backups. Then, you can move your backups there to help keep your actual shop page menu clean and tidy.